If you’re looking for a rich, creamy dessert that embodies the warmth and flavor of fall, then this pumpkin cheesecake recipe is exactly what you need. Combining the earthy sweetness of pumpkin with the tangy richness of cream cheese, this dessert is a crowd-pleaser at Thanksgiving dinners, autumn gatherings, or any time you’re craving a seasonal treat. In this article, we’ll walk you through the steps to make the perfect pumpkin cheesecake and provide tips to ensure it turns out beautifully every time.
Why Pumpkin Cheesecake?
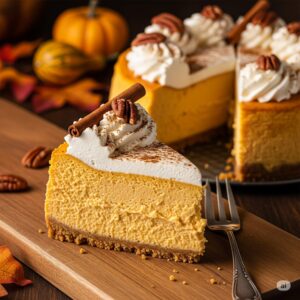
The classic pumpkin pie is always a favorite, but pumpkin cheesecake takes things up a notch. The smooth texture and balanced flavor of this dessert are irresistible. The graham cracker crust adds a satisfying crunch, while the spiced pumpkin filling and creamy cheesecake layer blend together to create a heavenly bite. Whether you serve it with a dollop of whipped cream or a drizzle of caramel, this pumpkin cheesecake recipe is sure to impress.
 Ingredients You’ll Need
Here’s a breakdown of what you need to create this decadent dessert:
For the Crust:
-
1 ½ cups graham cracker crumbs
-
¼ cup granulated sugar
-
½ cup unsalted butter, melted
For the Filling:
-
3 (8 oz) packages of cream cheese, softened
-
1 cup granulated sugar
-
1 tsp vanilla extract
-
3 large eggs
-
1 cup canned pumpkin puree
-
1 tsp ground cinnamon
-
½ tsp ground nutmeg
-
¼ tsp ground cloves
-
2 tbsp all-purpose flour
Optional Toppings:
-
Whipped cream
-
Chopped pecans
-
Caramel sauce
Step-by-Step Pumpkin Cheesecake Recipe
Step 1: Prepare the Crust
Preheat your oven to 325°F (163°C). In a medium bowl, mix the graham cracker crumbs, sugar, and melted butter until the crumbs are evenly coated. Press the mixture into the bottom of a 9-inch springform pan. Use the back of a spoon to compact the crust evenly. Bake for 10 minutes, then remove and let cool while you prepare the filling.
Step 2: Make the Cheesecake Filling
In a large mixing bowl, beat the softened cream cheese until smooth. Add the sugar and vanilla extract, and continue mixing until well combined. One at a time, add the eggs, beating slowly and scraping down the sides of the bowl as needed.
Next, stir in the pumpkin puree, cinnamon, nutmeg, cloves, and flour. Mix until the batter is smooth and fully incorporated. Pour the filling over the pre-baked crust and spread evenly with a spatula.
Step 3: Bake the Cheesecake
Place the cheesecake in the oven and bake at 325°F (163°C) for about 60–70 minutes, or until the center is just set and slightly jiggly. To prevent cracking, avoid opening the oven door during baking. Once done, turn off the oven and let the cheesecake sit inside with the door slightly open for 1 hour.
Step 4: Chill and Serve
Remove the cheesecake from the oven and refrigerate for at least 4 hours, preferably overnight. This step is crucial for achieving the perfect texture. Before serving, top with whipped cream, nuts, or caramel if desired.
Pro Tips for the Best Pumpkin Cheesecake
-
Use room temperature ingredients: This ensures a smoother batter and reduces the risk of lumps.
-
Don’t overmix: Overmixing can incorporate too much air and lead to cracks.
-
Use a water bath: Placing the springform pan in a water bath while baking helps regulate temperature and prevents the surface from cracking.
-
Chill thoroughly: A proper chill time allows the flavors to meld and the texture to set.
Variations to Try
Once you’ve mastered this classic pumpkin cheesecake recipe, feel free to experiment with different crusts like gingersnap cookies, or mix chocolate chips into the filling. You can also add a sour cream topping for a tangy contrast or swirl in some caramel for added richness.
Final Thoughts
This pumpkin cheesecake recipe is more than just a dessert—it’s a celebration of fall flavors and comfort. Whether you’re preparing it for a special occasion or simply indulging in the joys of baking, this treat delivers on taste and presentation. With a buttery crust, spiced pumpkin filling, and creamy texture, it’s a seasonal showstopper that you’ll want to make year after year.
So gather your ingredients and bring this cozy, delicious dessert to your table today. Your guests—and your taste buds—will thank you.
Learn more: green smoothie recipes